Trying to find The Right Size Digital Photo Structures. Ever brand and model may have a rather different design strategy, but generally a 7′ digital photo frame unit creates about a 3′ x 5′ photo display for your desk. There is no one-size-fits-all digital photo frame specification, in which means you can presently choose instead 7′, 8′, 9′ models amongst other size variants. Don’t forget to be able to at each model’s memory and storage.
As mentioned earlier, the Monster drink review is both positive and also negative. All I can advise is to consume it in moderation, so that its negative effects could be avoided. best digital picture frames canada. Cya!
The Satio camera furthermore equipped with typical mistakes features found generally top of the cloths line camera mobiles. Geo-tagging will allow users to label and tag their photos depending on where they were taken while the Touch capture feature will automatically concentrate on a specific subject in the frame when it is touched and capture a photo from it.
A newcomer to the Case CX700 is a switch that will a person to to give priority to either the boom or your swing functions. The CX700 also offers retractable side frames and an optional counterweight removal device, which makes transporting easier than actually.
If you find yourself infected by BDS/Hupigon.XD.75.backdoor or some other threats, you are sincerely suggested to free download best Spyware Scanner at the moment. You are able to employ a this good and trusted security tool to remove the annoying Backdoor, Adware, spyware and any future PC threats effectively. An individual decide to try other programs, try Best Spyware Scanner first, and will also be surprised!
The Nokia X2-01 in fact great phone is definitely geared toward the youth and even the young at heart which has an emphasis on music, but can this Nokia X series phone really live around its your outlook. I pick the dropper next towards the panel and click having an uniform area of one’s photo (black, white, or grey). Memorex is recognized for their innovative products, as well as 10-inch Digital Photo Frame with Wireless Remote Control isn’t exception. Accidents will probably happen and that means that it is readily available aluminum storage device cases with rubberized interior. Many digital camera models come with photo editing software.
We took it over and saw it from side to side. It looked a little like a Xmas trees. Then the photographer connected the USB flash disk at one for reds of the Pre lit christmas. By touching the screen, we can see all the pictures we just obtained. When we watched, comfortable music played from the jawhorse.
Itunes is the number 1 place to shop for movie downloads, anyone have don’t have any budgetary constraints. Here movies for iPhone 3G could be downloaded individually near a specific price. Also, the downloading time is a breeze, so noticing be able to separate downloading within this short time. Nonetheless, downloading a few movies at time can still include a bit expensive at Itunes.
Thursday, October 10, 2013
God Is On Your Side
Youth Minister, Music minister, singer-songwriter, former radio news anchor, imperfect follower of Jesus inspired by God's unconditional love, proud uncle... what else is there?“Ask and you will receive; seek and you will find; knock and the door will be opened to you. What father among you would hand his son a snake when he asks for a fish? If you then, who are wicked, know how to give good gifts to your children, how much more will the Father in heaven give the holy Spirit to those who ask him?”
If we open ourselves to the Holy Spirit and surrender our desires to God…then the yearnings that bubble up inside of us will actually be the Holy Spirit’s groaning in us for what our hearts truly need. As St. Paul explained it, “for we do not know how to pray as we ought, but the Spirit itself intercedes with inexpressible groanings” (Romans 8:26). So let us ask God to help us be in tune with what the Spirit is yearning for inside each of us. If we surrender to those “groanings” then we will be asking for what God already desires for us. When we seek…we will be on the path of receiving because God has already begun the process of giving. Jesus tells us that God always answers our pleas. However, what we receive may not be what our egos want…but will always be what our souls (true selves)need.
Suggested song of the day– “Breathe On Me” on the Listen to Your Heart album.
Listen to free clips of Bill’s songs by clicking on Bill Tonnis’ Music on iTunes to the right.
CDs available by clicking “home” and then the “store” tab.
Have a blessed day!
Listen to free clips of Bill’s songs by clicking on Bill Tonnis’ Music on iTunes to the right.
CDs available by clicking “home” and then the “store” tab.
Have a blessed day!
iTunes and Roaming User Profiles
If your organisation has made the move towards issuing staff with iPhones and iPads, you may well be railroaded into installing iTunes on their respective workstations. This is all well and good, but if you are also using “Folder Redirection” and “Roaming User Profiles”, you may find the hard disk space on your network file server depleting at an alarming rate.
Several of my users installed iOS 7 yesterday and their profiles swelled from a few hundred MB to 5 GB each!
If we discount any music / video they store on the devices for a moment, the large files that caused the majority of the damage are held within “C:\Users\UserName\AppData\Roaming\Apple Computer”. Specifically:
- C:\Users\UserName\AppData\Roaming\Apple Computer\MobileSync”
- C:\Users\UserName\AppData\Roaming\Apple Computer\iTunes\iPhone Software Updates”
So, as a damage limitation exercise (and to claim back some of my server storage), I decided to exclude the above folders from the roaming process by making use of group policy.
In a previous article, I implemented a similar policy to prevent the user “Download” folder from roaming: here. I have subsequently done the same for “SkyDrive”. So, if you follow those notes, simply add the two iTunes folders to the exclusion list (separated by a semi-colon).
The screen shot below shows how the policy setting now looks, with the Downloads; SkyDrive; and iTunes exceptions in place.

How to Back up iPad (iCloud or iTunes)
With the release date of iOS7 rapidly approaching, you should back up your iPad and iPhone. Is there a best way to back up your iPad and what are the choices?
You can back up most of your data on your iPad with iCloud or iTunes. Read that again…MOST. Those are Apple’s words, not mine.
Apple’s backup process is reproduced below. You can visit where this information came from at Apple’s knowledge base article here.
Backed-up information includes purchased music, TV shows, apps, and books*; photos and video in the Camera Roll; device settings (for example, Phone Favorites, Wallpaper, and Mail, Contacts, Calendar accounts); app data; Home screen and app organization; Messages (iMessage, SMS, and MMS), ringtones, and more. Media files synced from your computer aren’t backed up, but can be restored by syncing with iTunes.
* Backup of purchased music is not available in all countries. Backup of purchased TV shows occurs only in the United States. Previous purchases may not be restored if they are no longer in the iTunes Store, App Store, or iBooks Store.
iCloud
How to back up
iCloud automatically backs up the most important data on your device using iOS 5 or later. After you have enabled Backup on your iPhone, iPad, or iPod touch in Settings > iCloud > Backup & Storage, it will run on a daily basis as long as your device is:
How to back up
iCloud automatically backs up the most important data on your device using iOS 5 or later. After you have enabled Backup on your iPhone, iPad, or iPod touch in Settings > iCloud > Backup & Storage, it will run on a daily basis as long as your device is:
- Connected to the Internet over Wi-Fi
- Connected to a power source
- Screen locked
You can also back up manually whenever your device is connected to the Internet over Wi-Fi by choosing Back Up Now from Settings > iCloud > Storage & Backup.

iCloud backup settings
iCloud automatically backs up your device over Wi-Fi every day while it’s turned on, locked, and connected to a power source. With your device information backed up in iCloud, you can easily set up a new device or restore information on one you already have.
Here’s what iCloud backs up:
- Purchased music, movies, TV shows, apps, and booksPurchased music isn’t backed up in all countries. Purchased movies and TV shows are backed up only in the U.S. Previous purchases may be unavailable if they have been refunded or are no longer in the iTunes Store, App Store, or iBooks Store. Some previously purchased movies may not be available in iTunes in the Cloud. A movie’s product details page in the iTunes Store shows if the movie is unavailable.
- Photos and videos in your Camera Roll
- Device settings
- App data
- Home screen and app organization
- iMessage, text (SMS), and MMS messages
- Ringtones
- Visual Voicemail
iCloud doesn’t back up the following items:
- Music, movies, and TV shows not purchased from the iTunes Store
- Podcasts and audio books
- Photos that were originally synced from your computer
How to restore from a backup
When you go through Setup Assistant on a new device using iOS 5 or later, choose “Restore from iCloud Backup” and enter your iCloud account and password. You will see the three most recent backups for each of the devices on which you enabled Backup. Choose from which backup to restore.
If the home screen icons appear on your device and you wish to restore from an iCloud backup, erase your device (by going to Settings > General > Reset > Erase All Content and Settings). When prompted to set up as new or to restore from previous backup, select Restore from iCloud Backup. Enter your AppleID and password when prompted.

After your device restarts, your settings and accounts are restored and Backup starts downloading your purchased music, TV shows, apps, books, Camera Roll, and other content*. For best battery performance, leave your device connected to a power source until the restore is complete. You may be prompted to enter the passwords for all accounts enabled on your device.
A progress bar will appear underneath the apps that are being downloaded. To prioritize the restore of a specific app, tap its icon. Restore will attempt to download the same version of the app that you had installed previously. If that version is no longer available, the latest version of the app will be restored.
To check if the restore is complete, go to Settings > iCloud > Storage & Backup.
iTunes
How to back up
iTunes can create backups of your iOS device when you:
How to back up
iTunes can create backups of your iOS device when you:
Sync with iTunes (disabled if you have iCloud backup turned on)
Right-click (or Control-click) the iOS device in iTunes under Devices and choose Back Up
Use these steps to manually back up your iOS device using iTunes:
Right-click (or Control-click) the iOS device in iTunes under Devices and choose Back Up
Use these steps to manually back up your iOS device using iTunes:
Connect your iOS device to a computer with the latest version of iTunes installed.
Click the File menu and select Devices > Back up.
Or
Connect your iOS device to a computer with the latest version of iTunes installed.
Open the iOS device’s Summary tab. There are two ways to access this:
Click the File menu and select Devices > Back up.
Or
Connect your iOS device to a computer with the latest version of iTunes installed.
Open the iOS device’s Summary tab. There are two ways to access this:
Click the device button in the upper right corner. (If viewing the iTunes Store, click the Library button in the upper right corner. The device button will then be visible.)

From any view in iTunes, click the View menu and select Show Sidebar. Select your iOS device in iTunes under Devices.
Click the Back Up Now button.
Click the Back Up Now button.

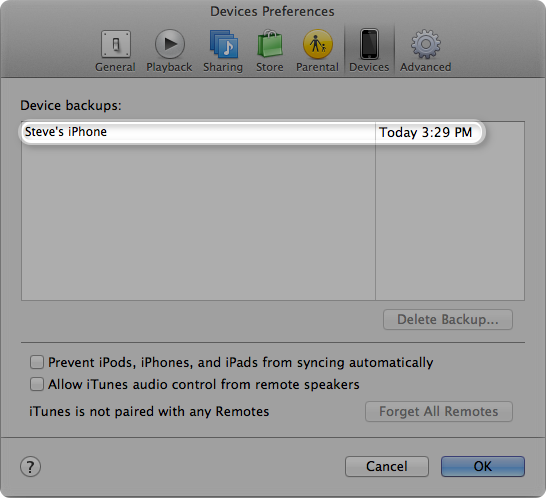
To verify that the backup finished successfully, open iTunes Preferences and select the Devices tab. The name of the device will appear along with the date and time the backup was created.
If using iTunes 10.7 or earlier:
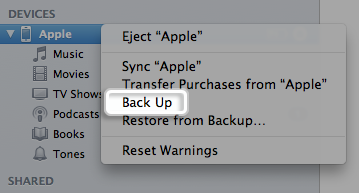
Right-click (or Control-click) the device and select Back Up.
Right-click (or Control-click) the device and select Back Up.
How to restore from a backup
To restore information from a backup, use one of the following methods after connecting your iOS device to the computer with which you normally sync:
To restore information from a backup, use one of the following methods after connecting your iOS device to the computer with which you normally sync:
Click the File menu and select Devices > Restore from Back up.
Or
Open the iOS device’s Summary tab. There are two ways to access this:
Click the device button in the upper right corner. (If viewing the iTunes Store, click the Library button in the upper right corner. The device button will then be visible.)
From any view in iTunes, click the View menu and select Show Sidebar. Select your iOS device in iTunes under Devices.
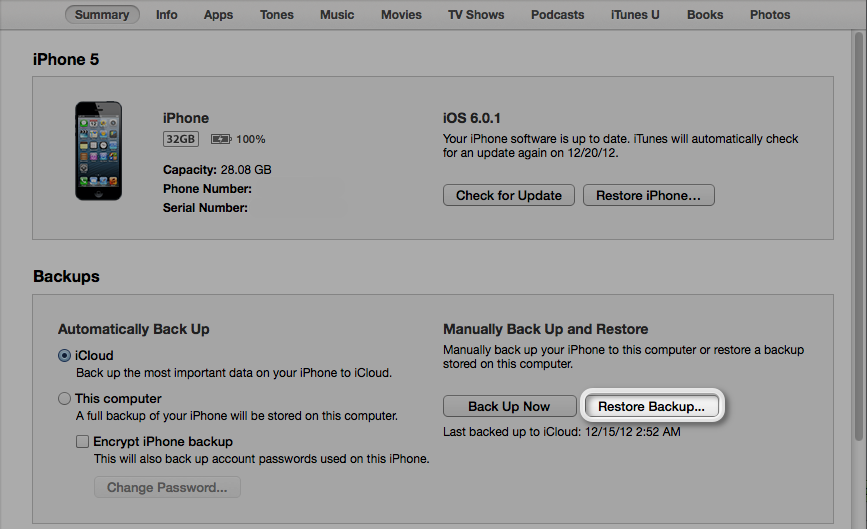
Click the Restore Backup button.
Or
Open the iOS device’s Summary tab. There are two ways to access this:
Click the device button in the upper right corner. (If viewing the iTunes Store, click the Library button in the upper right corner. The device button will then be visible.)
From any view in iTunes, click the View menu and select Show Sidebar. Select your iOS device in iTunes under Devices.
Click the Restore Backup button.
If using iTunes 10.7 or earlier:
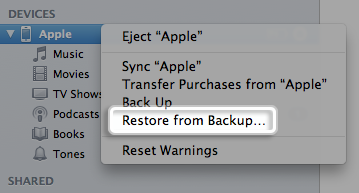
Right-click (or Control-click) the device and choose Restore from Backup
Right-click (or Control-click) the device and choose Restore from Backup
If you want to reference the guide on iCloud Backup,

Subscribe to:
Posts (Atom)